


So now in this blog we will learn editing of videos by using Wondershare Filmora.
Wondershare Filmora is the best video editing software as per me. It is very useful for beginners. Filmora interface is very easy to use you can find your desired option in very easy way. You can record videos with Filmora and you can also make your own image using the snapshot feature after editing it.
So now we are going to start your tutorial of editing videos with Filmora by starting with the features of Wondershare Filmora.
Features of Wondershare Filmora :-
• Music - By this feature you can add music in your video.
( How to use it )
Follow these steps : -
Step 1 - Select Music option in the Menu Bar .

Step 2 - In the music option you can add any music you like . To import music , Go to the option ( My Music ) . Here you can see a option of import . Click on import option for import music in the filmora .
Step 3 - To add music in you video double click on the music file in filmora .
• Text - By this features you can add text in your video. In the text option you can fill colour , Make text colourfull border and many more.
( How to use it )
Follow these steps :-
Step 1 - Select music option in the menu bar .

Step 2 - Select your text that you like . After adding you text in the video , Click on the text you can see an option of ( advance option ) click on it after reaching in the page you can colour you text , Colour text border and Make you text shadows .
• Transition - By this feature of filmora you can edit your video images .
( How to use it )
Follow these steps :-
Step 1 - Select transition in the menu bar .

Step 2 - Go to the transition . You can choose any transition for your image animation ending.
Step 3 - Choose the transition and double click on it . After clicking right button of the mouse go to the advance option , you can set the timing of the transition and you can select a colour for the transition.
• Filters - By this feature of filmora you can make your video effects .
(How to use it )
Follow these steps :-
Step 1 - Select filters in the menu bar .

Step 2 - After clicking on the filters , you can select any filter you like . You can download filters when its showing not in inventory .
Step 3 - You can change the opacity of the effect by clicking on it .
• Overlays - By this feature of filmora you can add advanced effects in the video .
(How to use it )
Follow these steps : -
Step 1 - Select overlay in the menu bar .
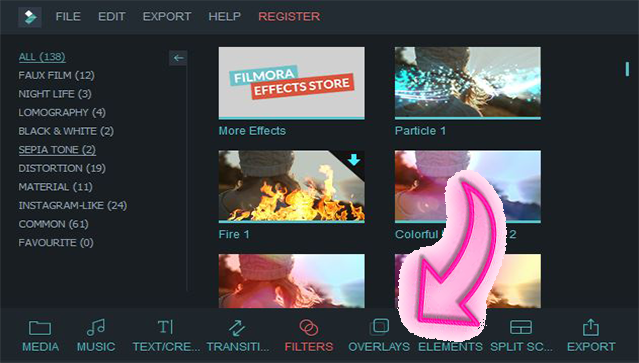
Step 2 - You can add any effect of the overlays by double clicking on it . you can set time of the overlay in advanced option .
Step 3 - You can go to the filmora store for more effects.
Step 4 - You can also decrease and increase the opacity of the effect in the advanced option.
• Elements - By this feature of filmora you can add texts of logos , Badges , arrows symbols and many more .
(How to use it )
Follow these steps :-
Step 1 - Select elements in the menu bar .

Step 3 - You can make motions of the symbols , text , logos in the advanced option.
• Split Screen - By this feature you can add two videos in one frame .
(How to use it )
Follow these steps : -
Step 1 - Select split screen in the menu bar .

Step 3 - Go to the advanced option of split screen . You can select you two video in the advanced option . To drop the videos , you can see option of (1 drop zone) and (2 drop zone) . Click on the drop zone . After you can select your video.
Basics of Wondershare filmora :-
• Cutting and pasting - You can cut and copy your video by this option of cut and paste .
(How to use it)
Step 1 - Select your video , right click on your video ,you can see an option of cut, click on it.After you can scroll your video not usable portion and after cut it. select the part of cut and delete it .
• Chroma key - This is the most important option of editing softwares . You can make green screen effect on your video by chroma key .
( How to use it )
Step 1 - You use this feature , when you have an problem of green screen animation.You can fix this problem by (chroma key). You have to add the animation in your video.Right click on your mouse and you can see an option of green screen ,click on it .after you have to click on the box named - Make parts of the transparent screen.
Step 2 - After you can cut the green screen and make your animation visible with your background video.You can increase the effect of the intensity level .


-You can see the green screen is removed from the animation.
• Exporting the project - You can export your video from the export option.
(How to use it )
Step 1 - click on the export option in the menu bar.
Step 2 - You can choose your video quality , Fps and bitrate .
Step 3 - click on the export option to save your video .


![What is Bluestacks ? [ Full Explanation ]](https://blogger.googleusercontent.com/img/b/R29vZ2xl/AVvXsEg4Fr_pF-5Abl1NlDSHK83EnT5GNBkpy-c5p2zigTJXpmuXF1e5DefsqPY-ax8UMUfoCxlqu95CQQT3oWZZPI-LQ8bsHAqL_Z0T5m4IiIcc7QzjLjYUx5SxEpm9FhBntwhKfQwyTAtihDCo/w680/What+is+Bluestacks2.png)


![Windows 11 is Safe ? [ Full Explanation ]](https://blogger.googleusercontent.com/img/b/R29vZ2xl/AVvXsEg9RA5KMEqhd7IJ418xT-nvoMcvI7eQwTk40Q4sszsePu1CSeDW311KZmwLXETYWNe9SnOrKVlOwYGw0TTDhC92wwNbjQysqb727-nvged_ite5qaV6EweuzGQCntwwt-7uHRl_-hXGF6MC/w680/11%252C22.png)

 Complete Tutorial)
0 Comments